NSF NEON, Operated by Battelle

Main navigation

  • About
    • NEON Overview
      • Vision and Management
      • Spatial and Temporal Design
      • History
    • About the NEON Biorepository
      • ASU Biorepository Staff
      • Contact the NEON Biorepository
    • Observatory Blog
    • Newsletters
    • Staff
    • FAQ
    • Contact Us

    About

  • Data
    • Data Portal
      • Data Availability Charts
      • API & GraphQL
      • Prototype Data
      • Externally Hosted Data
    • Data Collection Methods
      • Airborne Observation Platform (AOP)
      • Instrument System (IS)
        • Instrumented Collection Types
        • Aquatic Instrument System (AIS)
        • Terrestrial Instrument System (TIS)
      • Observational System (OS)
        • Observation Types
        • Observational Sampling Design
        • Sampling Schedules
        • Taxonomic Lists Used by Field Staff
        • Optimizing the Observational Sampling Designs
      • Protocols & Standardized Methods
    • Getting Started with NEON Data
      • neonUtilities for R and Python
      • Learning Hub
      • Code Hub
    • Using Data
      • Data Formats and Conventions
      • Released, Provisional, and Revised Data
      • Data Product Bundles
      • Usage Policies
      • Acknowledging and Citing NEON
      • Publishing Research Outputs
    • Data Notifications
    • NEON Data Management
      • Data Availability
      • Data Processing
      • Data Quality

    Data

  • Samples & Specimens
    • Biorepository Sample Portal at ASU
    • About Samples
      • Sample Types
      • Sample Repositories
      • Megapit and Distributed Initial Characterization Soil Archives
    • Finding and Accessing Sample Data
      • Species Checklists
      • Sample Explorer - Relationships and Data
      • Biorepository API
    • Requesting and Using Samples
      • Loans & Archival Requests
      • Usage Policies

    Samples & Specimens

  • Field Sites
    • Field Site Map and Info
    • Spatial Layers & Printable Maps

    Field Sites

  • Resources
    • Getting Started with NEON Data
    • Research Support Services
      • Field Site Coordination
      • Letters of Support
      • Mobile Deployment Platforms
      • Permits and Permissions
      • AOP Flight Campaigns
      • Research Support FAQs
      • Research Support Projects
    • Code Hub
      • neonUtilities for R and Python
      • Code Resources Guidelines
      • Code Resources Submission
      • NEON's GitHub Organization Homepage
    • Learning Hub
      • Tutorials
      • Workshops & Courses
      • Science Videos
      • Teaching Modules
    • Science Seminars and Data Skills Webinars
    • Document Library
    • Funding Opportunities

    Resources

  • Impact
    • Research Highlights
    • Papers & Publications
    • NEON in the News

    Impact

  • Get Involved
    • Upcoming Events
    • Research and Collaborations
      • Environmental Data Science Innovation and Inclusion Lab
      • Collaboration with DOE BER User Facilities and Programs
      • EFI-NEON Ecological Forecasting Challenge
      • NEON Great Lakes User Group
      • NCAR-NEON-Community Collaborations
    • Advisory Groups
      • Science, Technology & Education Advisory Committee
      • Technical Working Groups
    • NEON Ambassador Program
      • Exploring NEON-Derived Data Products Workshop Series
    • Partnerships
    • Community Engagement
    • Work Opportunities

    Get Involved

  • My Account
  • Search

Search

Learning Hub

  • Tutorials
  • Workshops & Courses
  • Science Videos
  • Teaching Modules

Breadcrumb

  1. Resources
  2. Learning Hub
  3. Tutorials
  4. Git 03: Git Clone - Work Locally On Your Computer

Tutorial

Git 03: Git Clone - Work Locally On Your Computer

Authors: Megan A. Jones

Last Updated: Apr 8, 2021

This tutorial covers how to clone a github.com repo to your computer so that you can work locally on files within the repo.

## Learning Objectives At the end of this activity, you will be able to:
  • Be able to use the git clone command to create a local version of a GitHub repository on your computer.

Additional Resources

  • Diagram of Git Commands -- this diagram includes more commands than we will cover in this series but includes all that we use for our standard workflow.
  • GitHub Help Learning Git resources.

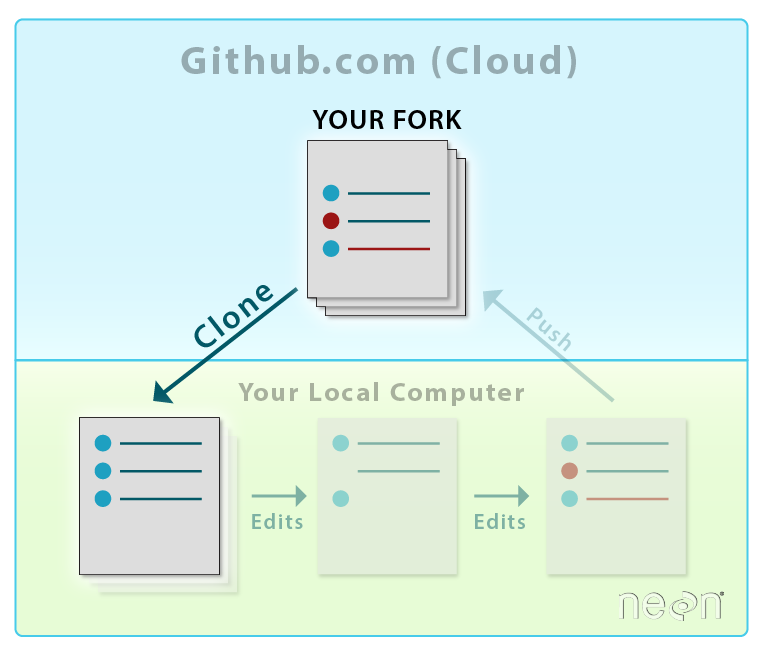
Clone - Copy Repo To Your Computer

In the previous tutorial, we used the github.com interface to fork the central NEON repo. By forking the NEON repo, we created a copy of it in our github.com account.

Graphic showing a fork of the central repository, which creates an exact copy of the repository in our own github account.
When you fork a repository on the github.com website, you are creating a duplicate copy of it in your github.com account. This is useful as a backup of the material. It also allows you to edit the material without modifying the original repository. Source: National Ecological Observatory Network (NEON)

Now we will learn how to create a local version of our forked repo on our laptop, so that we can efficiently add to and edit repo content.
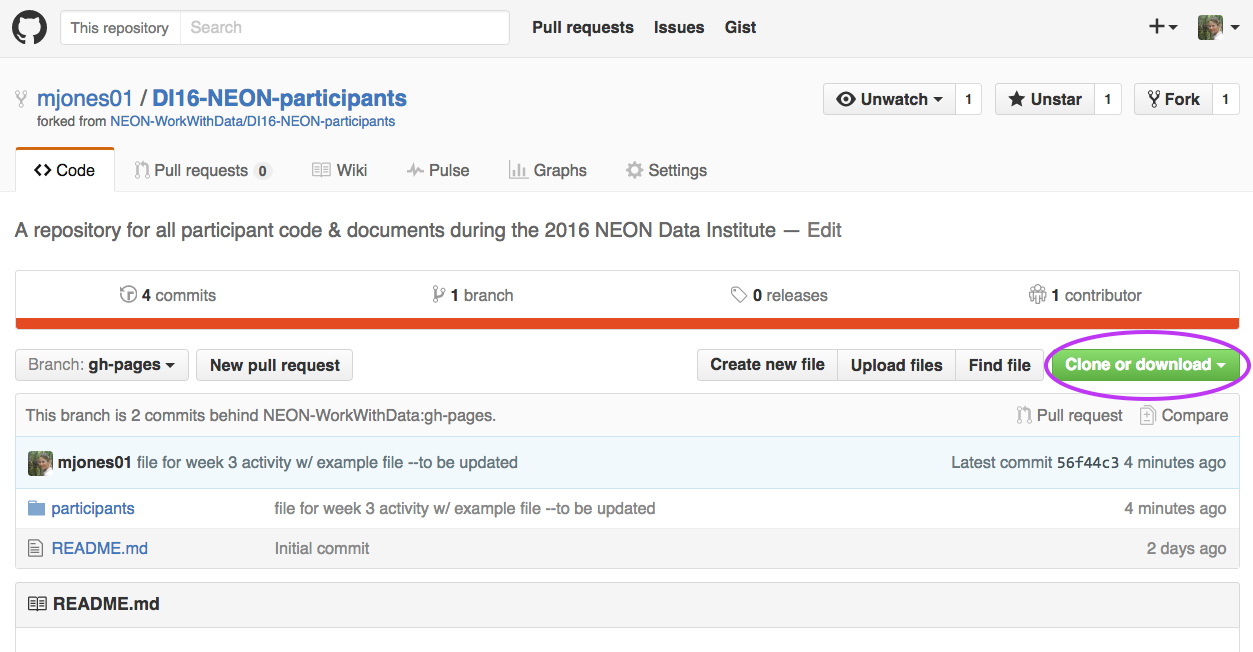
Graphic showing the workflow of creating a clone from the forked copy of the central repository, which creates an exact copy of the forked repository to your own computer. This process allows you to make edits to the documents on your own computer, and also serves as another backup of the materials.
When you clone a repository to your local computer, you are creating a copy of that same repo locally on your computer. This allows you to edit files on your computer. And, of course, it is also yet another backup of the material! Source: National Ecological Observatory Network (NEON)

Copy Repo URL

Start from the github.com interface:

  1. Navigate to the repo that you want to clone (copy) to your computer -- this should be YOUR-USER-NAME/DI-NEON-participants.
  2. Click on the Clone or Download dropdown button and copy the URL of the repo.
Screenshot of the NEON Data Institute forked repository on your personal github.com account. The image highlights the clone or download button, which allows you to copy the URL that you will need to clone the repository or download the files in the repository as a .zip file.
The clone or download drop down allows you to copy the URL that you will need to clone a repository. Download allows you to download a .zip file containing all of the files in the repo. Source: National Ecological Observatory Network (NEON).

Then on your local computer:

  1. Your computer should already be setup with Git and a bash shell interface. If not, please refer to the Institute setup materials before continuing.
  2. Open bash on your computer and navigate to the local GitHub directory that you created using the Set-up Materials.

To do this, at the command prompt, type:

$ cd ~/Documents/GitHub

Note: If you have stored your GitHub directory in a location that is different

  • i.e. it is not /Documents/GitHub, be sure to adjust the above code to represent the actual path to the GitHub directory on your computer.

Now use git clone to clone, or create a copy of, the entire repo in the GitHub directory on your computer.

# clone the forked repo to our computer
$ git clone https://github.com/neon/DI-NEON-participants.git
**Data Tip:** Are you a Windows user and are having a hard time copying the URL into shell? You can copy and paste in the shell environment **after** you have the feature turned on. Right click on your bash shell window (at the top) and select "properties". Make sure "quick edit" is checked. You should now be able to copy and paste within the bash environment.

The output shows you what is being cloned to your computer.

Cloning into 'DI-NEON-participants.git'...
remote: Counting objects: 3808, done.
remote: Total 3808 (delta 0), reused 0 (delta 0), pack-reused 3808
Receiving objects: 100% (3808/3808), 2.92 MiB | 2.17 MiB/s, done.
Resolving deltas: 100% (2185/2185), done.
Checking connectivity... done.
$

Note: The output numbers that you see on your computer, representing the total file size, etc, may differ from the example provided above.

View the New Repo

Next, let's make sure the repository is created on your computer in the location where you think it is.

At the command line, type ls to list the contents of the current directory.

# view directory contents
$ ls

Next, navigate to your copy of the data institute repo using cd or change directory:

# navigate to the NEON participants repository
$ cd DI-NEON-participants

# view repository contents
$ ls

404.md			_includes		code
ISSUE_TEMPLATE.md	_layouts		images
README.md		_posts			index.md
_config.yml		_site			institute-materials
_data			assets			org

Alternatively, we can view the local repo DI-NEON-participants in a finder (Mac) or Windows Explorer (Windows) window. Simply open your Documents in a window and navigate to the new local repo.

Using either method, we can see that the file structure of our cloned repo exactly mirrors the file structure of our forked GitHub repo.

**Thought Question:** Is the cloned version of this repo that you just created on your laptop, a direct copy of the NEON central repo -OR- of your forked version of the NEON central repo?

Summary Workflow -- Create a Local Repo

In the github.com interface:

  • Copy URL of the repo you want to work on locally

In shell:

  • git clone URLhere

Note: that you can copy the URL of your repository directly from GitHub.


Got questions? No problem. Leave your question in the comment box below. It's likely some of your colleagues have the same question, too! And also likely someone else knows the answer.

Questions?

If you have questions or comments on this content, please contact us.

Contact Us
NSF NEON, Operated by Battelle

Follow Us:

Join Our Newsletter

Get updates on events, opportunities, and how NEON is being used today.

Subscribe Now

Footer

  • About Us
  • Contact Us
  • Terms & Conditions
  • Careers
  • Code of Conduct

Copyright © Battelle, 2026

The National Ecological Observatory Network is a major facility fully funded by the U.S. National Science Foundation.

Any opinions, findings and conclusions or recommendations expressed in this material do not necessarily reflect the views of the U.S. National Science Foundation.